Introduction
 Favicons, short for "favorite icons," are small icons associated with a website, typically displayed in the browser's address bar or next to the site's name in bookmarks. While seemingly inconspicuous, favicons play a crucial role in web design and user experience.
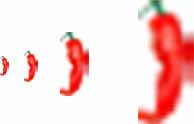
In another article "Creating an .ico Favicon," we discussed how to create an .ico Favicon of about 16x16 pixels in size. While this would work well in browsers displayed on most PCs, if the same thing was displayed on a large smart TV, the image would possibly look rather unpleasant. The accompanying image shows what happens to the image as it is displayed on larger display screens. In this article, we will discuss why creating other sizes is important, how it is done, and how we get them displayed on a website.
1. Why Favicons Matter
- Enhancing Brand Recognition: Favicons provide a visual representation of a website's brand, helping users quickly identify and remember it.
- Improving User Experience and Navigation: Favicons aid in navigation by visually distinguishing between multiple open tabs and bookmarks, making it easier for users to find and return to a specific website.
- Establishing Professionalism and Credibility: A well-designed favicon reflects attention to detail and professionalism, instilling trust and credibility in the website and its content.
- Ensuring Consistency Across Devices and Platforms: Favicons ensure consistent branding and user experience across different browsers, devices, and platforms.
2. Choosing the Right Favicon Format
When selecting a favicon format, consider compatibility with various browsers and platforms:
- ICO (Windows Icon Format): Widely supported by Windows browsers and operating systems.
- PNG (Portable Network Graphics): Suitable for most modern browsers and offers support for transparency.
- SVG (Scalable Vector Graphics): Ideal for responsive design as it scales seamlessly to different sizes without loss of quality.
Ensure cross-browser and cross-platform compatibility by providing fallback options for different formats.
Google Chrome
- ICO: Supported, traditionally used for favicons.
- PNG: Supported, offers advantages such as transparency.
- SVG: Supported, ideal for scalable, resolution-independent icons.
- WebP: Supported, though more commonly used for web images than favicons.
Mozilla Firefox
- ICO: Supported, with compatibility for multi-resolution ICO files.
- PNG: Supported, commonly used due to its flexibility and quality.
- SVG: Supported, allowing for scalable icons across different resolutions.
- WebP: Supported for images, but SVG or PNG is preferred for favicons.
Apple Safari
- ICO: Supported, but PNG is generally preferred for better quality.
- PNG: Supported, widely used for favicons on Safari.
- SVG: Support varies, especially for older versions; checking compatibility is advised.
- WebP: Supported for images, but favicons are typically PNG or ICO.
- SVG: Specifically for pinned tab icons, allowing a vector image to be used for crisp display.
Microsoft Edge
- ICO: Supported, commonly used for backward compatibility.
- PNG: Supported, providing good quality and transparency.
- SVG: Supported, especially useful for ensuring sharpness at any scale.
- WebP: Supported for images, but not commonly used for favicons.
Opera
- ICO: Supported, as it's the traditional format for favicons.
- PNG: Supported, offering better quality and transparency over ICO.
- SVG: Supported, ideal for a crisp display on high-resolution screens.
- WebP: Supported for images, but PNG or SVG is preferred for favicons.
3. Selecting & Creating the Appropriate Favicon Sizes
Favicons come in various sizes to accommodate different resolutions and devices:
- Standard Sizes: Common favicon sizes include 16x16, 32x32, 48x48, and 64x64 pixels. Note that some authorities also recommend providing 128x128, and 256x256 pixels as well.
- Optimization: Optimize favicon files to reduce file size without sacrificing quality, improving loading times and performance.
I use Photoshop and so the following instructions are based on that. But it is basically the same for most any similar program.
Creating the PNG and WebP formatted images
- Try making your base ico image at least 300x300 pixels. Since I am using Photoshop, I will be using the psd format.
- Using the image editing software of your choice, export the image three times as a png. Once as 16x16, next as a 32x32, and once more as a 64x64.
NOTE: We need to save it one more time as a png using the original size which I recommended to be 300x300. We will be using this later to create the svg image. - Next, repeat the same sequence but this time save the images using the jpg format. Ensure that you use the highest quality possible.
- Now load the three jpgs into Photoshop and then save each one as type webp using the [Save as type] dropdown menu.
NOTE: You may have to make a fake change to the jpg to save it.
Creating the SVG formatted images
We now have completed the png and WebP formats. Let's do the SVGs next,
Luckily, Adobe Express provides a free service for this. The URL is https://new.express.adobe.com/tools/convert-to-svg.
Take your largest png image (300x300s) and drop it into the area provided on the screen. You will have to sign in with your Adobe sign-in or create a new one. If it doesn't come out nicely, try going back and either making your original image larger or ensuring that you saved a png of your ico at a size of at least 300x300px.
Creating the ICO formatted Images
Now, we have the .ico format to deal with. You can refer to the article Creating an .ico Favicon for information on this. Personally, I only make the 16x16 as this format is mostly replaced now by the other three formats.
4. Editing the website to load our new ico files
This section describes:
- Where to copy the favicon files we created above.
- How to write the coding that will load our favicons into the browser.
- Why and How to create a child template (if you have one already skip this)
- How to copy the parent index.php file to the child templat.
- Where to paste the coding we created above into the child index.php file.
- Testing to see if the favicons are working properly.
Copying the favicon image files to the server
I created a file named favicons in the base /image directory. I then copied the following files that I created above to that file.
- apple-touch-icon.png
- cayenne_ico.svg
- cayenne_ico_16.ico
- cayenne_ico_16.png
- cayenne_ico_32.png
- cayenne_ico_64.png
- cayenne_ico_64.webp
- cayenne_ico_286_transparent.png
- cayenne_ico_286x286.webp
Writing the coding that will load the favicon image files
Using Windows Notepad or any other text editor create a file similar to the one shown here.
<link rel="icon" type="image/x-icon" href="/images/favicons/cayenne_ico_16.png">
<!-- PNG Favicon -->
<link rel="icon" type="image/png" sizes="286x286" href="/images/favicons/cayenne_ico_286_transparent.png">
<link rel="icon" type="image/png" sizes="64x64" href="/images/favicons/cayenne_ico_64.png">
<link rel="icon" type="image/png" sizes="32x32" href="/images/favicons/cayenne_ico_32.png">
<link rel="icon" type="image/png" sizes="16x16" href="/images/favicons/cayenne_ico_16.png">
<!-- SVG Favicon -->
<link rel="icon" type="image/svg+xml" href="/images/favicons/cayenne_ico.svg">
<!-- WEBP Favicon (Note: Not all browsers support WEBP for favicons, ensure to have fallbacks) -->
<link rel="icon" type="image/webp" href="/images/favicons/cayenne_ico.webp">
<!-- Apple Touch Icon (Optional for Apple devices) -->
<link rel="apple-touch-icon" sizes="286x286" href="/images/favicons/apple-touch-icon.png">
<!-- Manifest for PWA (Optional) -->
<link rel="manifest" href="/images/favicons/site.webmanifest">
NOTE: Perhaps you noticed the "Manifest" section at the bottom. We are preparing an article to explain this, but rather than having to re-edit this file later, you may find it useful to input it now.
Why you need a child template and how to create it
If you have a child template already, you may scip this section.
You have a choice of directly editing the base Cassiopeia file, in which case it will get overwritten every time you update to a new version of Joomla. Or you can create a Cassiopeia child template in which case you don't have to worry about it.
Steps to create a child template
- Open up the backend of your Joomla website
- Go to System > Site Templates > Select Cassiopeia Details and Files > Create Child Template
- Enter an appropriate name. It will appear as Cassiopeia_NameYouPicked_Details and Files after you save it.
- Using your FTP app, copy /template/cassiopeia/index.php to the new child template in the directory /templates/cassiopeai_NameYouPIcked/ directory
You have now finished creating your child template and a place for you to safely store the index.php file that we will now edit
Editing the index.php file
- Using a text editor, open the index.php file that we moved to your new child template.
- Copy the coding that we created above and paste just after the <head> statement at about line 129 and just before the <jdoc:include type="metas" /> line
- Save it.
- Empty the cache on your browser and refresh your website on your browser.
Congratulations!!! You should be able to see your new favicons in the browser header!!!!
5. Conclusion
In conclusion, favicons are essential elements of web design, contributing to brand recognition, user experience, and credibility. By selecting the right format and size, web developers can ensure consistent branding and seamless navigation across browsers and devices. Paying attention to the details of favicon design and implementation can significantly enhance the overall quality of a website and its user experience.
ChatGPT Acknowledgment